


Showing posts with label Blogger Tips. Show all posts
Showing posts with label Blogger Tips. Show all posts
Saturday, 2 June 2012
0
Saturday, 2 June 2012
Tanmay Kapse
We are living in a world that rewards instant gratification; people do not want to take the time to read a book, if the movie is available. In other words, "a picture is worth a thousand words." It should not be difficult to see why illustrations are important when keeping readers interested in your blog posts. Pictures can help readers to follow your writing more easily, breaking up the text so that it doesn't look like one long, tedious piece of work.
Here are some tips on how to choose the best images for your blog posts:

(#1.) Relevance - blog posts are generally there to persuade readers to show interest in a certain topic, product, or service. Adding pictures to help illustrate those concepts can only help, but don't go overboard. Shy away from adding pictures for the sake of adding pictures. Make sure that you are putting up illustrations that are going to add to the relevance of your text, not take away from it. It is easy to add too much, so try to keep it straight forward and to the point, just like the text.
(#2.) Copyrights - always remember that not all images are available for your use. There are copyrights for images that are on the internet as well as copyrights for images that are in print. If you want to avoid any problems that you might encounter with copyrighted materials, use your own images. Go looking for images that give relevance to your post and take the pictures yourself. If that doesn't seem like a viable option for you, there are public image sites that you can locate off of any search engine. Most search engines will provide you with an image option; type in the object or term that you are looking for and browse through the hundreds of images that are available to use without objection. If you find an image on another blog or site that you would like to use, remember to be courteous. It is polite to send a short email or contact the owner of the site asking for permission to use the image.
(#3.) Editing - it is important to do minor (and sometimes major) editing on your images before just sticking them up on your blog. It is more than aggravating to have to wait an eternity for a page to load because the file is too large. In fact, in this "instant gratification" world, no one waits for a page to load for very long without just moving along. If you have a file to add that is of larger size, put a thumbnail up on the page. If users want to wait to view the full photo, they have that option. If not, it doesn't create problems when loading. When finalising photos or images for your blog post, keep clarity in mind. A clean and crisp image gets the point across a lot better than an unclear one. Photoshop is a great tool to use before putting pictures up on your blog; you can add or subtract from an image as needed, and sometimes it is needed.
(#4.) Avoid - there are some things that you should try and avoid when choosing images for your blog post. For instance, animations are great and can potentially add just the right ingredient to your post, but it is important to think about internet connections. Some people don't have the fastest connections, and you don't want to alienate parts of your audience. It is also a good idea to stay away from background images; they can slow the process of loading your page down to snail pace. Account for those readers who may want to print your post without the background attached.
(#5.) Include - there are images that are better to use than others and should be highly considered. You want to make sure that you are using unique illustrations. If people have seen the image a thousand times, it loses its weight. People associate certain objects with a product or service and you want your readers to associate illustrations with your work. Include pictures that capture the essence of what you are trying to relay to your readers, it doesn't have to be completely literal. Capitalise on reader satisfaction by using photos that mean something to them; use pictures of people, kids, animals. Everyone likes to laugh, so adding a humorous image is a tool that will keep readers returning to your page. This is your chance to shine, to set yourself apart from similar blogs or from those that are selling the same product or service. Images can very easily turn into a mascot for a particular product, site or service. Mascots can be very beneficial to a business and finding a good one starts with searching through images that are relevant to your end goals.
Follow @shipsocker
Read More

How to Choose Brilliant Images for Your Blog Posts
We are living in a world that rewards instant gratification; people do not want to take the time to read a book, if the movie is available. In other words, "a picture is worth a thousand words." It should not be difficult to see why illustrations are important when keeping readers interested in your blog posts. Pictures can help readers to follow your writing more easily, breaking up the text so that it doesn't look like one long, tedious piece of work.
Here are some tips on how to choose the best images for your blog posts:
(#1.) Relevance - blog posts are generally there to persuade readers to show interest in a certain topic, product, or service. Adding pictures to help illustrate those concepts can only help, but don't go overboard. Shy away from adding pictures for the sake of adding pictures. Make sure that you are putting up illustrations that are going to add to the relevance of your text, not take away from it. It is easy to add too much, so try to keep it straight forward and to the point, just like the text.
(#2.) Copyrights - always remember that not all images are available for your use. There are copyrights for images that are on the internet as well as copyrights for images that are in print. If you want to avoid any problems that you might encounter with copyrighted materials, use your own images. Go looking for images that give relevance to your post and take the pictures yourself. If that doesn't seem like a viable option for you, there are public image sites that you can locate off of any search engine. Most search engines will provide you with an image option; type in the object or term that you are looking for and browse through the hundreds of images that are available to use without objection. If you find an image on another blog or site that you would like to use, remember to be courteous. It is polite to send a short email or contact the owner of the site asking for permission to use the image.
(#3.) Editing - it is important to do minor (and sometimes major) editing on your images before just sticking them up on your blog. It is more than aggravating to have to wait an eternity for a page to load because the file is too large. In fact, in this "instant gratification" world, no one waits for a page to load for very long without just moving along. If you have a file to add that is of larger size, put a thumbnail up on the page. If users want to wait to view the full photo, they have that option. If not, it doesn't create problems when loading. When finalising photos or images for your blog post, keep clarity in mind. A clean and crisp image gets the point across a lot better than an unclear one. Photoshop is a great tool to use before putting pictures up on your blog; you can add or subtract from an image as needed, and sometimes it is needed.
(#4.) Avoid - there are some things that you should try and avoid when choosing images for your blog post. For instance, animations are great and can potentially add just the right ingredient to your post, but it is important to think about internet connections. Some people don't have the fastest connections, and you don't want to alienate parts of your audience. It is also a good idea to stay away from background images; they can slow the process of loading your page down to snail pace. Account for those readers who may want to print your post without the background attached.
(#5.) Include - there are images that are better to use than others and should be highly considered. You want to make sure that you are using unique illustrations. If people have seen the image a thousand times, it loses its weight. People associate certain objects with a product or service and you want your readers to associate illustrations with your work. Include pictures that capture the essence of what you are trying to relay to your readers, it doesn't have to be completely literal. Capitalise on reader satisfaction by using photos that mean something to them; use pictures of people, kids, animals. Everyone likes to laugh, so adding a humorous image is a tool that will keep readers returning to your page. This is your chance to shine, to set yourself apart from similar blogs or from those that are selling the same product or service. Images can very easily turn into a mascot for a particular product, site or service. Mascots can be very beneficial to a business and finding a good one starts with searching through images that are relevant to your end goals.
Posted in Blogger Tips
0
Tanmay Kapse
What are Heading Tags?
H means "Heading" tags. They starts from H1 to H6 in descending order of importance. The words written in H1 tags are most important words in our whole blog and the search robots give first search priority to these H1 Tags. H2 tag are less important than H1 and so on to H6. These tags plays very important role in our SEO. They are used to tell the search robots about the most important words in our blog which should be crawl first. Headline tags are also used to organize our posts. They are very useful for our posts visibility in search engines.

How To Use Headline Tags In Your Blog?
As already said, H1 tag is the most important tag in our whole blog, so it should be used only once per page of your blog to avoid duplicate contenting. In every blog (including Blogger), H1 tags are used as Blog's title. Search robots also consider the words written in H1 tag as your blog's title. So the most important thing after Blog's title is your Posts Title which should be written under H2 tags. But, I noticed that most of the Bloggers are using H3 tag as post title which is tremendously reducing the post visibility in search engines.
Increase Traffic :
Convert Your Posts From H3 to H2 Tag
Now you've successfully completed the job!
Follow @shipsocker
Read More
Optimize Your Headings For more Traffic
What are Heading Tags?
H means "Heading" tags. They starts from H1 to H6 in descending order of importance. The words written in H1 tags are most important words in our whole blog and the search robots give first search priority to these H1 Tags. H2 tag are less important than H1 and so on to H6. These tags plays very important role in our SEO. They are used to tell the search robots about the most important words in our blog which should be crawl first. Headline tags are also used to organize our posts. They are very useful for our posts visibility in search engines.
How To Use Headline Tags In Your Blog?
As already said, H1 tag is the most important tag in our whole blog, so it should be used only once per page of your blog to avoid duplicate contenting. In every blog (including Blogger), H1 tags are used as Blog's title. Search robots also consider the words written in H1 tag as your blog's title. So the most important thing after Blog's title is your Posts Title which should be written under H2 tags. But, I noticed that most of the Bloggers are using H3 tag as post title which is tremendously reducing the post visibility in search engines.
Increase Traffic :
Convert Your Posts From H3 to H2 Tag
- Go to Blogger Dashboard >> Your Blog >> Template.
- Backup your template.
- Now click Edit HTML and check the box of expand widget template.
- Search for h3.post-title.
- Now replace it with h2.post-title. (Replace all h3.post-title in your template).
- Now find the following code:
<h3><data:title/></h3>
- And replace it with the following:
<h2><data:title/></h2>
Now you've successfully completed the job!
Posted in Blogger Tips, Blogger Tutorials
Friday, 1 June 2012
0
Friday, 1 June 2012
Tanmay Kapse

When ever it comes to earn online, Google Adsense is the only platform which makes sense. Google Adsense is the single online advertising program which is vastly use by countless users all across the globe. Google Adsense allows its users to monetize their blog/website with most desirable advertisements. But on the other hand Google is not allowing small publishers to apply for new Google Adsense account due to the increase in violation of rules and regulations. If any one applies for Adsense account from his blog or website which is of low quality, then they might face detention in form of getting permanently banned from Adsense. So it’s better to stay away from Google Adsense until you establish a high profile blog or website.
This is the major reason why Small Publishers are looking for an alternative for the blogs and website. So today we will share the hottest Google Adsense alternatives. So all the small publishers can get what they richly deserve.
Infolinks – Intext Advertising:

 Withdraw Rates – Infolinks:

 Withdraw Rates – Clicksor:

Follow @shipsocker
Read More
Top 6 Alternatives For Adsense

When ever it comes to earn online, Google Adsense is the only platform which makes sense. Google Adsense is the single online advertising program which is vastly use by countless users all across the globe. Google Adsense allows its users to monetize their blog/website with most desirable advertisements. But on the other hand Google is not allowing small publishers to apply for new Google Adsense account due to the increase in violation of rules and regulations. If any one applies for Adsense account from his blog or website which is of low quality, then they might face detention in form of getting permanently banned from Adsense. So it’s better to stay away from Google Adsense until you establish a high profile blog or website.
This is the major reason why Small Publishers are looking for an alternative for the blogs and website. So today we will share the hottest Google Adsense alternatives. So all the small publishers can get what they richly deserve.
Infolinks – Intext Advertising:
Infolinks is the top most Advertising program after Google Adsense. It provides Intext advertising for all kind of text based websites and blogs. If you have decent traffic on your site then you can make handsome revenue with Infolinks. If you want to use Infolinks you don’t need a high profile website or blog. All you need to do is to apply for a new Infolinks Publisher account and within 24 hours your account will be approved.
How To Get Started – Infolinks:
And after you get approved from Infolinks you can integrate it with your site by simple 3 minutes integration guide. Once you integrated Infolinks with your site, the bots will crawl your site and according to your content will display matched keywords ads. At any time you can sign in to your Infolinks Publishers account to track each and every click that you had received.
Withdraw Rates – Infolinks:
Infolinks has the finest payout rates. You can withdraw your money from PayPal, BankWire Transfer or by using Infolinks debit cards. The minimum payout rates are 50 dollars for PayPal and Debit Cards but for BankWire transfer minimum payout rate is 400 dollars
Clicksor – Deliver where it Matters:
Clicksor.com offers webmasters the opportunity to earn additional income by simply underlining a selection of clickable text or displaying targeted contextual banners on their websites or blogs. Clicksor is the best alternative for Adsense as they have the third largest publisher network after Infolinks and Adsense.
Withdraw Rates – Clicksor:
Another plus point of Clicksor is, like Adsense it doesn’t have a minimum payout of 100$. If your account balance reaches 50$ then straight away you can withdraw it. You can also earn some extra revenue by referring your friend to Clicksor. You can choose to get paid with PayPal, Check or Wired Transfer.
AdBrite – We Serve Your Ads:
AdBrite is very similar to Buysellads.com. It does not provide any automatic advertisements. Instead of showing ads it shows a link Text “Your Ads Here” which allows advertiser to advertise on your site. By using this link users can buy ads from AdBrite which they want to display on your site.
Other Adsense Alternatives:
So These are the remaining hottest Adsense alternative programs.
- Chtika: Best CPC website with high paying ads
- BidVertiser: Bidvertiser is an excellent alternative to Adsense
- Kontera: These are in-line contextual ad networks just like infolinks
So Now what are you waiting for? Just choose among the best Adsense alternatives and start earning equal to what Adsense publishers are earning.This is it for now, till then peace
Posted in Adsense Tips, Blogger Tips
Monday, 28 May 2012
0
Monday, 28 May 2012
Tanmay Kapse

Follow @shipsocker
Read More
Always Redirect Your Blogger Blog To blogspot.COM
Recently Google changed a lot of things along with their policies. Google started redirecting blogger blogs to country-specific URL.Lets consider that you have open anyblog.blogspot.comin your browser, you might be redirected to anyblog.blogspot.in if you are located in India or to anyblog.blogspot.com.au if you access the same blog from Australia.It is not a new thing since few days that your blogspot.com blog may redirect to a country based domain. Perhaps it is worldwide. Every blogger blog owner may have the same problem of automatic redirection. So here in this post, we have a tweak that enables your blog to stay on blogspot.com URL.
How To Redirect Your Blogger Blog To .Blogspot.Com?
We will apply this hack with using very short JavaScript.
- Go to Blogger Dashboard > Design > Edit HTML.
- Take a backup/download your template.
- Find for </head> tag.
- Add below piece of JavaScript code just above </head> tag.
<script type="text/javascript">
var blog = document.location.hostname;
var slug = document.location.pathname;
var ctld = blog.substr(blog.lastIndexOf("."));
if (ctld != ".com") {
var ncr = "http://" + blog.substr(0, blog.indexOf("."));
ncr += ".blogspot.com/ncr" + slug;
window.location.replace(ncr);
}
</script>
Now save your template.
Now your Blogger Blog will always redirect to the blogspot.com URL.
That was the simple solution for a big problem. I hope you all will like this hack.
Now your Blogger Blog will always redirect to the blogspot.com URL.
That was the simple solution for a big problem. I hope you all will like this hack.
Posted in Blogger Tips, Css
Sunday, 27 May 2012
0
Sunday, 27 May 2012
Tanmay Kapse
 Loyal readers form the backbone of a blog. Making that loyalty a rewarding experience can do wonders to your blog's reputation as well as its traffic. The first thoughts about these so called "Loyalty Program" might be about their hefty costs but here PunchTab comes into the picture.
More about PunchTab

Follow @shipsocker
Read More
How To Introduce A Free Loyalty Program On Your Blog
Loyal readers form the backbone of a blog. Making that loyalty a rewarding experience can do wonders to your blog's reputation as well as its traffic. The first thoughts about these so called "Loyalty Program" might be about their hefty costs but here PunchTab comes into the picture. More about PunchTab
PunchTab is a instant loyalty platform that allows blog owners to create loyalty program for free in minutes. Using it you can integrate a reward program for your readers without any hassles of costs or coding.
How it Works
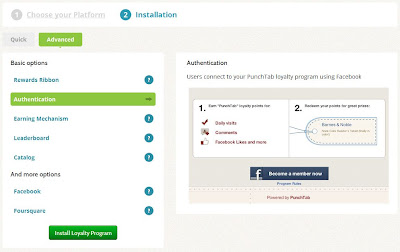
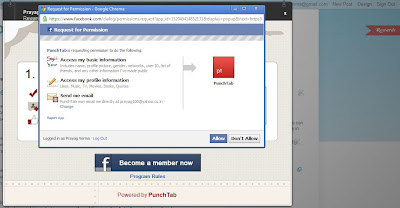
PunchTab requires that user to authenticate through Facebook to enroll into the loyalty program. After that they can start earning reward points for the following activities:
Visiting – for their first visit to your site every day your users will earn 100 points
Liking your content– for their first Like on your site every day your users will earn 100 points
Tweeting your content – for their first Tweet on your site every day your users will earn 100 points
Google +1 your content – for their first Google +1 on your site every day your users will earn 100 points
Commenting – for their first comment of the day your users will earn 100 points
After they reach a certain points level, they can select a coupon from the catalog and redeem their points.
Is it Free?
Hell yes !! , the default catalog which contains three coupons (Including Amazon gift card) is absolutely free But in case you decide that these rewards don't meet your goals ,then you are free to make a Custom catalog which contains rewards of your choice and at the points of your choice. In custom catalog you have option to add your own actions for which points are given like following a account,voting for a poll,etc
How Do I integrate it into my Blog
1. Go to PunchTab.com and sign up with a valid email and blog address. (You have to confirm that email ,but you can do that later.)

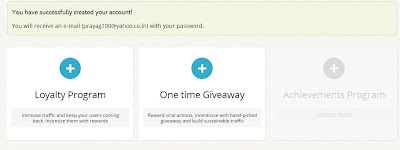
2. After that you will be redirected to a page asking whether you want to create a Loyalty Program or a One time Giveaway. Select the loyalty program option.

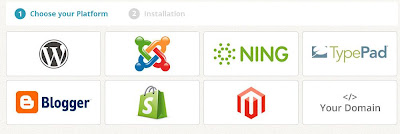
3. Now you will be asked to choose your platform, Choose Blogger and continue.

4. Now you will be asked to select various things about the loyalty program like where the ribbons is to be placed, about the catalog,etc. After selecting the options click on "Install Loyalty program".

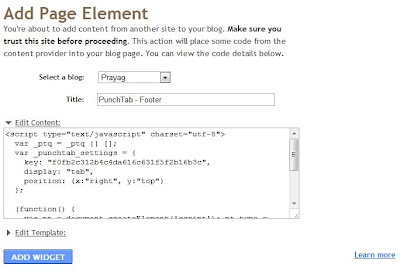
5.Again click on the Install PunchTab button and you will be redirected to Blogger for adding the Widget.After you have added the widget successfully , you will see a ribbon on your Blog named "Rewards"

6. Now click on the Reward ribbon and become the first Loyal reader of your own blog after authenticating yourself through Facebook

Some things to Note
- As you might have thought in the last step, you can yourself become a point earner on your own blog and then redeem those too.
- As of now, third party sharing widgets like ShareThis ,AddThis are not supported by PunchTab. Only default Like,Tweet and Plusone button are supported.
- The Plusone button requires that you add a <div class='punchtab-plusone' ></div> ,where you want the Plusone button to appear.
- The Plusone buttons has some defects too. In case the Reader Un+1 any content and then again +1 that content , then they get points even if they had +1ed it earlier.
- You get either the option to add a Ribbon or a Sidebar Gadget. In the ribbon option you have 4 default placement options. In case they overlap with your content, you can move it easily with CSS. For example if you wanted to move the ribbon 50px up then this is the code#red_tab{top:-50px !important;}
- A small red ribbon appears before every Share button telling your readers that they earn points by doing that action (like Tweet ,Like ,Plusone and Comment) . In case you don't want it appear before the share buttons then in the widget add the following line of code. More Info here
earningmap: false - Blogger comments are supported but only the embedded once and not the Popup once
Posted in Blogger Tips, Css
Saturday, 26 May 2012
0
Saturday, 26 May 2012
Tanmay Kapse
 Visitors seem to trust on your posts more if they see your posts being shared a wide number of times. And if they start trusting your posts they are bound to do something more for the promotion for your blog.Hence its the trust energy we have to provide to them.And this trust energy comes from the number of times your blog has been shared.
Talking of sharing , the only name that come's up is Facebook.Placing like buttons for your blog is a good idea to use. Previously facebook share buttons were used. But now facebook like buttons are on a roar.This time we are going to take help from your facebook friends.
So how exactly can you increase the number of likes for your facebook fanpage ?
Assuming you have created a account on facebook page of your blog , we begin with the instructions. If you haven't created it is highly recommended you do make one.
So let's begin :-
Follow @shipsocker
Read More
How to Get more Likes for your Blog ?

Talking of sharing , the only name that come's up is Facebook.Placing like buttons for your blog is a good idea to use. Previously facebook share buttons were used. But now facebook like buttons are on a roar.This time we are going to take help from your facebook friends.
So how exactly can you increase the number of likes for your facebook fanpage ?
Assuming you have created a account on facebook page of your blog , we begin with the instructions. If you haven't created it is highly recommended you do make one.
So let's begin :-
- Login to your facebook profile .
- Go to your facebook fanpage
- There you will see " Admin Panel "
- Below that look for a box with its heading as " Invite Friends "

- Click on Invite button
- Click as many as you can .
This usually results in 5-8 likes in a day. You can keep doing so as many times you want. After all numbers do matter !!

As you would like your blog to be promoted even i want to . Please help me do so .
It takes only 5 mins to share .......
Posted in Blogger Tips, Css
Subscribe to:
Posts (Atom)


 Posts
Posts


